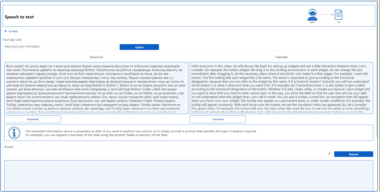
From vibe coding to vibe deployment. UBOS MCP turns ideas into infra with one message.
Clickhouse MCP server
A Clickhouse database MCP server project.
Installation
You can install the package using uv:
uv pip install clickhouse-mcp-server
Or using pip:
pip install clickhouse-mcp-server
Components
Tools
The server provides two tools:
connect_database: Connects to a specific Clickhouse databasedatabaseparameter: Name of the database to connect to (string)- Returns a confirmation message when connection is successful
execute_query: Executes Clickhouse queriesqueryparameter: SQL query/queries to execute (string)- Returns query results in JSON format
- Multiple queries can be sent separated by semicolons
Configuration
The server uses the following environment variables:
CLICKHOUSE_HOST: Clickhouse server address (default: “localhost”)CLICKHOUSE_USER: Clickhouse username (default: “root”)CLICKHOUSE_PASSWORD: Clickhouse password (default: “”)CLICKHOUSE_DATABASE: Initial database (optional)CLICKHOUSE_READONLY: Read-only mode (set to 1/true to enable, default: false)
Quickstart
Installation
Claude Desktop
MacOS: ~/Library/Application Support/Claude/claude_desktop_config.json
Windows: %APPDATA%/Claude/claude_desktop_config.json
Development/Unpublished Server Configuration
{
  "mcpServers": {
    "clickhouse-mcp-server": {
      "command": "uv",
      "args": [
        "--directory",
        "/Users/burakdirin/Projects/clickhouse-mcp-server",
        "run",
        "clickhouse-mcp-server"
      ],
      "env": {
        "CLICKHOUSE_HOST": "localhost",
        "CLICKHOUSE_USER": "root",
        "CLICKHOUSE_PASSWORD": "password",
        "CLICKHOUSE_DATABASE": "[optional]",
        "CLICKHOUSE_READONLY": "true"
      }
    }
  }
}
Published Server Configuration
{
  "mcpServers": {
    "clickhouse-mcp-server": {
      "command": "uvx",
      "args": [
        "clickhouse-mcp-server"
      ],
      "env": {
        "CLICKHOUSE_HOST": "localhost",
        "CLICKHOUSE_USER": "root",
        "CLICKHOUSE_PASSWORD": "password",
        "CLICKHOUSE_DATABASE": "[optional]",
        "CLICKHOUSE_READONLY": "true"
      }
    }
  }
}
Installing via Smithery
To install Clickhouse Database Integration Server for Claude Desktop automatically via Smithery:
npx -y @smithery/cli install @burakdirin/clickhouse-mcp-server --client claude
Development
Building and Publishing
To prepare the package for distribution:
- Sync dependencies and update lockfile:
uv sync
- Build package distributions:
uv build
This will create source and wheel distributions in the dist/ directory.
- Publish to PyPI:
uv publish
Note: You’ll need to set PyPI credentials via environment variables or command flags:
- Token:
--tokenorUV_PUBLISH_TOKEN - Or username/password:
--username/UV_PUBLISH_USERNAMEand--password/UV_PUBLISH_PASSWORD
Debugging
Since MCP servers run over stdio, debugging can be challenging. For the best debugging experience, we strongly recommend using the MCP Inspector.
You can launch the MCP Inspector via npm with this command:
npx @modelcontextprotocol/inspector uv --directory /Users/burakdirin/Projects/clickhouse-mcp-server run clickhouse-mcp-server
Upon launching, the Inspector will display a URL that you can access in your browser to begin debugging.
Clickhouse MCP Server
Project Details
- burakdirin/clickhouse-mcp-server
- MIT License
- Last Updated: 3/17/2025
Recomended MCP Servers

A MCP (Model Context Protocol) server for interacting with LimeSurvey.
A secure MCP (Model Context Protocol) server that enables AI agents to interact with the Authenticator App.
MCP server for graph representation of a codebase
MCP Server for running Postman Collections with Newman
Stream Brave Search (web & local) results via a Model Context Protocol (MCP) / Server-Sent Events (SSE) interface....
Kakao Mobility MCP Server for directions and transit information
Official Firecrawl MCP Server - Adds powerful web scraping to Cursor, Claude and any other LLM clients.
openai websearch tool as mcp server
flutter mcp server
The Gatherings MCP Server provides an API that allows AI assistants to interact with the Gatherings application through...
Clone a voice in 5 seconds to generate arbitrary speech in real-time
Featured Templates
View More