
- Updated: January 2, 2026
- 6 min read
How to Build a FreeBSD Home NAS with ZFS Mirror (RAID1) – Step‑by‑Step Guide
Answer: To build a reliable FreeBSD‑based home NAS with a ZFS mirror (RAID1), install FreeBSD, partition two disks as freebsd‑zfs slices, create a mirrored zpool, set a mount point, enable lz4 compression, and configure the boot loader to load the ZFS module at startup.
FreeBSD Home NAS with ZFS Mirror – A Quick‑Start News Summary
Home users and small‑business owners are constantly looking for affordable, high‑performance storage that doesn’t sacrifice data safety. The recent FreeBSD ZFS mirror tutorial demonstrates how to turn a modest PC into a rock‑solid NAS using native FreeBSD tools. This article distills the original guide into a concise, SEO‑friendly news piece, adds a custom illustration, and weaves in relevant UBOS homepage resources for readers who want to extend their setup with AI‑driven automation.
Why Choose a ZFS Mirror (RAID1) for Your Home NAS?
ZFS (Zettabyte File System) combines a traditional file system with volume‑manager capabilities, delivering features that are especially valuable for a DIY NAS:
- Data redundancy: A mirror (RAID1) writes identical data to two disks, protecting against a single‑disk failure.
- Instant consistency checks: ZFS continuously verifies checksums, catching silent corruption before it spreads.
- Built‑in compression: Enabling
lz4can reduce storage usage by 20‑30 % without noticeable CPU impact. - Snapshots & rollbacks: One‑click snapshots let you revert to a previous state, ideal for accidental deletions.
- Scalability: Adding more mirrors or expanding the pool is straightforward, keeping the system future‑proof.
These advantages make ZFS a perfect match for a FreeBSD NAS that serves media libraries, backups, or small‑business file shares.
Step‑by‑Step Summary of the ZFS Mirror Setup
1. Install FreeBSD (preferably via SSH)
Boot the target machine with the FreeBSD LiveCD, enable the network interface, and start the SSH daemon. This allows you to run bsdinstall from a remote workstation, a method highlighted in the original guide.
# ifconfig em0 up
# dhclient em0
# service sshd onestart
# bsdinstall
During installation, select the Ports collection (useful for later adding AI marketing agents or other packages).
2. Disk Partitioning – Prepare Two Mirrors
Assuming two SATA SSDs ada1 and ada2, wipe any existing layout and create GPT tables:
# gpart destroy -F ada1
# gpart destroy -F ada2
# gpart create -s gpt ada1
# gpart create -s gpt ada2
Next, add a single freebsd‑zfs partition on each disk:
# gpart add -t freebsd-zfs ada1
# gpart add -t freebsd-zfs ada2
These steps mirror the Chroma DB integration approach of preparing clean storage back‑ends for AI workloads.
3. Create the ZFS Mirror (zpool)
With the partitions ready, create a mirrored pool named tank:
# zpool create tank mirror ada1p1 ada2p1The command instantly assembles the two disks into a single logical volume. Verify the pool status:
# zpool status tank
pool: tank
 state: ONLINE
  config:
    NAME        STATE     READ WRITE CKSUM
    tank        ONLINE       0     0     0
      mirror-0  ONLINE       0     0     0
        ada1p1  ONLINE       0     0     0
        ada2p1  ONLINE       0     0     0
For those who love visual dashboards, the UBOS portfolio examples showcase how to embed ZFS health widgets into a web UI.
4. Set Mount Points & Enable Compression
By default, the pool mounts at /tank. Change it to a more descriptive path, such as /data:
# zfs set mountpoint=/data tankActivate lz4 compression to save space without sacrificing speed:
# zfs set compression=lz4 tankThese settings are especially handy when you later run AI‑driven services like the OpenAI ChatGPT integration on the same hardware.
5. Configure the Boot Loader for ZFS
Because the root filesystem lives on UFS in the tutorial, the ZFS pool must be loaded early in the boot process. Add the following line to /boot/loader.conf:
zfs_load="YES"Enable the ZFS daemon at runtime:
# sysrc zfs_enable=YESAfter a reboot, zpool status should still report the pool as ONLINE, confirming that the system boots directly into the mirrored storage.
For a more automated approach, explore the Workflow automation studio to script these steps across multiple devices.
Illustration of the FreeBSD ZFS Mirror Architecture
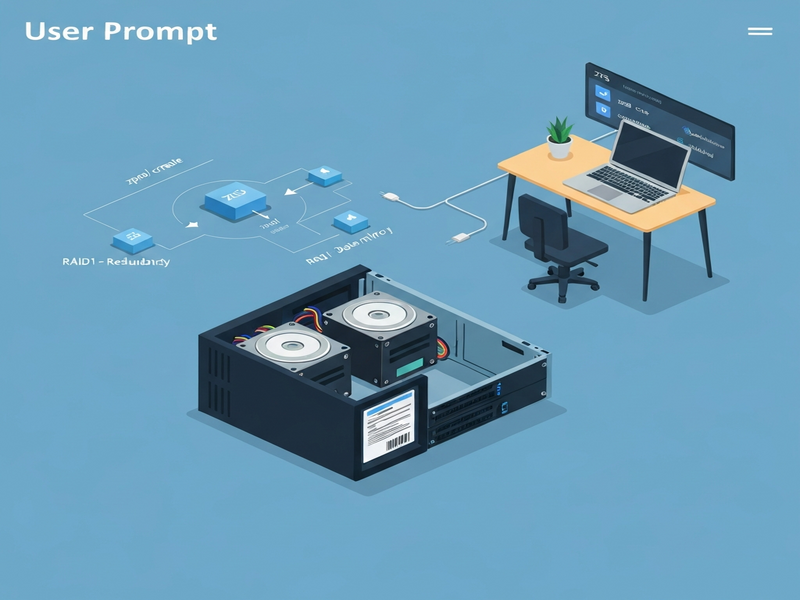
The diagram visualizes the two SSDs, the mirrored zpool, and the mount point hierarchy. It also highlights where the boot loader and compression layer sit in the stack.
Read the Full Original Tutorial
For a deeper dive—including network configuration, firewall rules, and advanced ZFS dataset management—visit the original guide on RTFM. The step‑by‑step commands there match the summary above, but the article also covers post‑installation tuning that can further improve performance.
Extend Your NAS with UBOS AI & Automation Tools
Once your FreeBSD NAS is up and running, you can enrich it with AI‑powered services from UBOS. Below are hand‑picked internal resources that complement a ZFS‑based storage platform:
- UBOS platform overview – Learn how UBOS abstracts infrastructure, making it easy to deploy containers on top of your NAS.
- UBOS for startups – A guide on leveraging low‑cost storage for rapid product prototyping.
- UBOS solutions for SMBs – Scale from a single NAS to a multi‑node environment without re‑architecting your data layer.
- Enterprise AI platform by UBOS – Integrate machine‑learning pipelines that read directly from your ZFS pool.
- AI marketing agents – Automate content generation and social posting using the storage you just built.
- UBOS partner program – Join a community of developers who share templates and best practices for storage‑centric AI apps.
- Web app editor on UBOS – Quickly spin up a web UI to browse and manage files stored in ZFS.
- Workflow automation studio – Create automated backup, sync, and notification pipelines that trigger on ZFS events.
- UBOS pricing plans – Find a cost‑effective tier that matches your home‑NAS budget.
- UBOS templates for quick start – Deploy ready‑made solutions like AI SEO Analyzer or AI Article Copywriter directly on your storage.
- Telegram integration on UBOS – Receive real‑time alerts when a disk fails or a snapshot is created.
- ChatGPT and Telegram integration – Query your NAS status via a conversational bot.
- ElevenLabs AI voice integration – Turn system notifications into natural‑sounding voice alerts.
- AI Video Generator – Create tutorial videos that showcase your NAS setup, hosted directly from the ZFS pool.
- AI YouTube Comment Analysis tool – Run sentiment analysis on community feedback about your NAS project.
- AI Chatbot template – Offer a help‑desk bot that answers storage‑related questions.
- GPT-Powered Telegram Bot – Combine the power of GPT with your ZFS mirror for on‑demand data queries.
- AI Image Generator – Produce custom graphics (like the diagram above) on the fly.
Conclusion: Your DIY FreeBSD NAS Is Ready for the Future
By following the concise steps above, you now have a resilient FreeBSD NAS backed by a ZFS mirror. The setup delivers data protection, built‑in compression, and instant snapshots—all without third‑party RAID cards. Moreover, the integration possibilities with UBOS’s AI ecosystem turn a simple storage box into a smart hub capable of automated backups, voice alerts, and even AI‑generated content.
Ready to take the next step? Explore the UBOS homepage for a free trial, or dive straight into the UBOS partner program to collaborate with other enthusiasts building AI‑enhanced NAS solutions.
Start building, start automating, and let your home network storage work smarter for you.