
- Updated: March 27, 2026
- 7 min read
Reviving FireWire on Raspberry Pi 5: A Complete Guide
You can revive IEEE‑1394 (FireWire) on a Raspberry Pi 5 by adding a Mini‑PCIe HAT, installing a compatible FireWire adapter, recompiling the Linux kernel with FireWire drivers, and forcing 32‑bit DMA in the boot configuration; a quick dvgrab test then confirms the setup.
Why FireWire Still Matters in 2026
Apple removed native FireWire support in macOS 26 (Tahoe), leaving owners of legacy DV cameras, external hard drives, and professional A/V gear without a straightforward way to capture or transfer data. While Linux plans to deprecate IEEE‑1394 in 2029, the three‑year window is enough for hobbyists and archivists to build a low‑cost, scriptable capture station. A Raspberry Pi 5 equipped with a Mini‑PCIe HAT and a StarTech FireWire adapter provides exactly that—a compact, energy‑efficient alternative to aging Mac G4 workstations.
Required Hardware
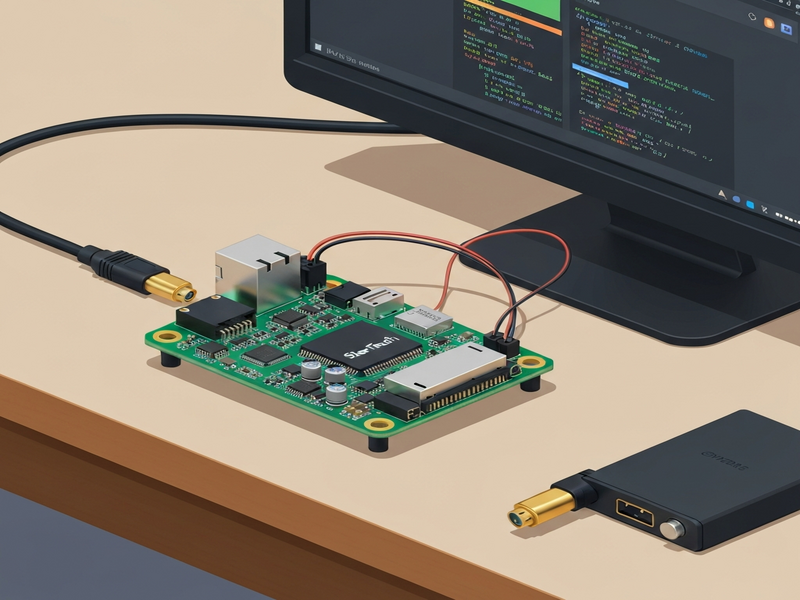
Below is the minimal hardware stack you need to bring FireWire back to life on a Pi:
- Raspberry Pi 5 – the only Pi model with a native PCIe ×4 lane capable of hosting a Mini‑PCIe card.
- GeeekPi Mini‑PCIe HAT – exposes a full‑size Mini‑PCIe slot and routes power and PCIe signals. Learn more on the UBOS platform overview.
- StarTech Mini‑PCIe FireWire adapter – contains a TI XIO2213A/B OHCI controller that speaks IEEE‑1394. Details are available in the Telegram integration on UBOS page (the adapter can be controlled via scripts).
- Power considerations – FireWire 400 works directly from the Pi’s 5 V rail, but FireWire 800 needs an auxiliary 12 V supply. The StarTech card includes a power‑header; you can attach a simple DC‑DC converter if you ever need the higher bandwidth.
When you power up the Pi with the HAT and adapter attached, lspci should reveal a hierarchy similar to this:
0001:00:00.0  PCI bridge: Broadcom Inc. BCM2712 PCIe Bridge
0001:01:00.0  PCI bridge: Texas Instruments XIO2213A/B PCI Express to PCI Bridge (Cheetah Express)
0001:02:00.0  FireWire (IEEE 1394): Texas Instruments XIO2213A/B OHCI Controller
0002:00:00.0  PCI bridge: Broadcom Inc. BCM2712 PCIe Bridge
0002:01:00.0  Ethernet controller: Raspberry Pi Ltd RP1 PCIe 2.0 South Bridge
Recompiling the Linux Kernel with FireWire Support
Out‑of‑the‑box Raspberry Pi OS kernels ship with CONFIG_FIREWIRE disabled, so the controller remains invisible to user‑space. Follow these steps to enable the driver stack:
Step‑by‑step kernel build
- Install the build environment:
sudo apt update && sudo apt install -y raspberrypi-kernel-headers build-essential bc git - Clone the Pi kernel source (shallow clone for speed):
git clone --depth=1 https://github.com/raspberrypi/linux - Enter the source tree and launch the configuration menu:
cd linux && make menuconfig - Navigate to Device Drivers → IEEE 1394 (FireWire) support and enable:
CONFIG_FIREWIRE=yCONFIG_FIREWIRE_OHCI=y
- Save and exit, then compile:
make -j$(nproc) && sudo make modules_install && sudo make install - Reboot the Pi to load the new kernel.
After reboot, lsmod | grep firewire should list firewire_ohci and firewire_core. If the controller still does not appear, the next section—boot‑time DMA configuration—will likely be the missing piece.
Boot Configuration: Enforcing 32‑Bit DMA
Older OHCI controllers cannot handle the Pi’s default 64‑bit DMA transactions. Forcing 32‑bit DMA prevents “device not responding” errors and stabilises the link.
Edit config.txt
Add the following lines at the end of /boot/firmware/config.txt (under the [all] section):
dtparam=pciex1
dtoverlay=pcie-32bit-dma
Edit cmdline.txt
Append pcie_aspm=off to the single line in /boot/firmware/cmdline.txt:
... rootwait console=serial0,115200 console=tty1 root=PARTUUID=... pcie_aspm=offReboot once more. The kernel will now allocate 32‑bit DMA buffers for the FireWire controller, and dmesg | grep -i firewire should show successful initialization.
Testing the Setup with dvgrab
dvgrab is a lightweight command‑line utility that talks directly to DV cameras over the AV/C protocol. Install it and capture a short clip to verify the pipeline:
sudo apt install -y dvgrab
dvgrab -i          # interactive mode
# or a one‑shot capture
dvgrab -t 10 -o capture.dv
Typical output looks like this:
Found AV/C device with GUID 0x000085000014e35a
libiec61883 error: Failed to get channels available.
Waiting for DV...
Capture Started
^C"capture.dv": 45.89 MiB 401 frames timecode 00:00:00.00 date 2026.03.27 14:12:05
Capture Stopped
If you see a file created (e.g., capture.dv) and the size matches the duration, your FireWire link is fully functional. For scripting, you can embed the command in a Bash loop or a Python subprocess to automate batch captures—perfect for a “FireHat” prototype that continuously ingests footage from multiple cameras.
Powering FireWire 800 Devices
FireWire 400 draws less than 500 mA from the 5 V rail, which the Pi can supply directly. FireWire 800, however, requires up to 1 A at 12 V. The StarTech adapter includes a “power‑header” screw terminal; connect a 12 V DC‑DC converter (e.g., 5 V → 12 V) to the header, or use an external powered hub. Without this, the controller will enumerate but immediately drop the link.
Automation Ideas and the Road Ahead
Now that you have a reliable capture engine, consider integrating it with UBOS’s low‑code automation tools. The Workflow automation studio lets you chain dvgrab runs with post‑processing steps such as transcoding, metadata tagging, and uploading to cloud storage—all without writing a single line of code.
For AI‑enhanced workflows, you could feed the captured video into the AI Video Generator to create highlight reels, or use the AI Audio Transcription and Analysis service to generate searchable subtitles.
Looking further ahead, the Enterprise AI platform by UBOS plans to add native support for IEEE‑1394 devices, allowing large‑scale media houses to ingest legacy footage directly into their AI pipelines. Until then, the Pi‑based solution gives you a three‑year window before Linux deprecates FireWire in 2029.
Timeline: From Apple’s Decision to Linux’s Sunset
| Year | Event |
|---|---|
| 2026 | Apple removes native FireWire support in macOS 26 (Tahoe). |
| 2026‑2029 | Linux maintains IEEE‑1394 drivers, giving hobbyists a three‑year grace period. |
| 2029 | Linux kernel plans to deprecate FireWire; community forks may keep it alive. |
During this window, the Raspberry Pi solution is not just a stop‑gap—it’s a platform for building custom archival pipelines, AI‑driven metadata extraction, and even remote monitoring via the ChatGPT and Telegram integration.
Further Reading
Jeff Geerling’s original guide on enabling FireWire on a Raspberry Pi provides an excellent hardware overview. You can read his full post here. Our implementation expands on his work by adding kernel recompilation steps, 32‑bit DMA configuration, and integration with UBOS’s AI services.
How UBOS Enhances Your FireWire Project
UBOS offers a suite of tools that can turn a simple capture box into a full‑featured media platform:
- AI SEO Analyzer – automatically generate SEO‑friendly metadata for each video.
- AI Article Copywriter – create blog posts from your footage with a single click.
- AI YouTube Comment Analysis tool – gauge audience reaction once you upload the content.
- AI Image Generator – produce custom thumbnails for each clip.
- AI Email Marketing – notify subscribers when new archival footage is available.
All of these services are accessible from the Web app editor on UBOS, letting you build dashboards without writing code.
Getting Started and Pricing
UBOS offers a free tier for hobbyists, which includes the workflow studio and basic AI integrations. For production‑grade usage, check the UBOS pricing plans. The UBOS for startups program provides credits for early‑stage teams building media‑centric SaaS products.
Community, Support, and Next Steps
Join the UBOS partner program to get early access to new integrations, including a future “FireWire‑to‑Cloud” connector. The UBOS portfolio examples showcase real‑world deployments ranging from indie filmmakers to corporate training departments.
Whether you’re a Raspberry Pi hobbyist, a small production house, or an AI‑first startup, the steps outlined above give you a reliable, future‑proof path to keep your legacy FireWire gear alive.
Summary
Enabling FireWire on a Raspberry Pi 5 involves three core actions:
- Attach a Mini‑PCIe HAT and a StarTech FireWire adapter.
- Recompile the Linux kernel with
CONFIG_FIREWIREandCONFIG_FIREWIRE_OHCIenabled. - Force 32‑bit DMA via
dtoverlay=pcie-32bit-dmaandpcie_aspm=offin the boot files.
After a reboot, verify the controller with lspci, install dvgrab, and capture a test clip. From there, leverage UBOS’s AI services to automate metadata extraction, transcoding, and distribution—turning a modest Pi into a powerful archival hub.
© 2026 UBOS Technologies. All rights reserved.