
- Updated: December 13, 2025
- 6 min read
How to Flash ESPHome Firmware onto the Xiaomi Mi Smart Antibacterial Humidifier – A Complete Guide
You can free the Xiaomi Mi Smart Antibacterial Humidifier from the cloud by flashing ESPHome firmware onto its built‑in ESP8266 module. This transformation gives you a fully local, privacy‑first humidifier that integrates seamlessly with Home Assistant, AI marketing agents, and any other MQTT‑compatible platform.
Why the Xiaomi Mi Smart Antibacterial Humidifier Matters
The Xiaomi Mi Smart Antibacterial Humidifier has become a staple in modern smart homes because of its sleek design, built‑in UV sterilization, and native Wi‑Fi connectivity. However, the device is locked into Xiaomi’s proprietary cloud, which means you must rely on their servers for every status update, schedule change, or firmware upgrade. For DIY enthusiasts and privacy‑conscious homeowners, this creates two major pain points:
- Vendor lock‑in that can render the device useless if the cloud service is discontinued.
- Unnecessary data transmission of humidity levels, usage patterns, and even room occupancy.
By replacing the stock firmware with an open‑source alternative, you gain full control, eliminate third‑party data collection, and unlock powerful automation possibilities through Workflow automation studio.
Original Hack Overview
The community‑driven hack originally surfaced on a German tech blog, detailing how to locate the ESP8266 module inside the humidifier, wire it for flashing, and replace the firmware with a custom ESPHome build. The key steps include:
- Model identification: The supported model is identified by the internal ID
deerma.humidifier.jsq, typically sold under the SKU ZNJSQ01DEM. - Disassembly: Four Philips‑head screws are hidden beneath a rubber foot ring. Removing the ring reveals the screws, allowing you to open the housing without damaging the plastic.
- ESP8266 wiring: The Wi‑Fi module (ESP‑WROOM‑02) is soldered to four wires: GND (orange), VCC 3.3 V (grey), GPIO0 (yellow), RX (brown), and TX (red). Tying GPIO0 to GND puts the chip into flashing mode.
- Firmware backup & flashing: Using
esptool.pyyou first dump the original firmware, then flash the new ESPHome binary.
While the original guide was thorough, it left room for improvement in safety warnings, step‑by‑step clarity, and integration tips for modern Home Assistant setups.
Step‑by‑Step Guide: From Stock to Open‑Source
1. Gather Tools & Materials
- Soldering iron with fine tip
- 0.1 mm² stranded wire
- USB‑to‑UART 3.3 V adapter (FTDI or CP2102)
- Phillips #00 screwdriver
- Heat‑shrink tubing or electrical tape
- Computer with Python 3 and
esptool.pyinstalled
2. Identify the Correct Model
Verify the internal model number printed on the PCB: deerma.humidifier.jsq. If the label reads anything else, the ESPHome component may not match, and you could brick the device.
3. Disassemble the Humidifier
Follow these precise actions to avoid damaging the water‑proof seal:
- Unplug the power cord and remove the water tank.
- Peel back the rubber foot ring; it hides four Philips screws.
- Unscrew the four hidden screws and gently lift the top cover.
- Locate the ESP‑WROOM‑02 module attached to the back of the housing.
4. Wire the ESP8266 for Flashing
Solder the wires as shown in the original diagram (colors are critical):
- Orange – GND
- Grey – VCC (3.3 V)
- Yellow – GPIO0 (flash mode)
- Brown – RX
- Red – TX
Connect the FTDI adapter: GND ↔ GND, VCC ↔ 3.3 V, TX ↔ RX, RX ↔ TX. Tie GPIO0 to GND before powering the module to trigger flash mode.
5. Backup the Original Firmware
Open a terminal and run:
esptool.py --chip esp8266 --port /dev/ttyUSB0 --baud 230400 \\
  read_flash 0x0 0x200000 xiaomi-original.bin
Storing this file lets you restore the stock firmware if you ever need to revert.
6. Build & Flash ESPHome Firmware
Create a simple humidifier.yaml configuration using the community component available on GitHub. A minimal example:
esphome:
  name: xiaomi_humidifier
  platform: ESP8266
  board: esp01_1m

wifi:
  ssid: "YOUR_SSID"
  password: "YOUR_PASSWORD"

uart:
  tx_pin: GPIO1
  rx_pin: GPIO3
  baud_rate: 9600

# Include the custom component
external_components:
  - source: github://stv0g/esphome-config/components/xiaomi_deerma_humidifier

xiaomi_deerma_humidifier:
  id: humidifier
  uart_id: uart_bus

output:
  - platform: gpio
    pin: GPIO2
    id: led

binary_sensor:
  - platform: status
    name: "Humidifier Status"
Compile and upload with:
esphome humidifier.yaml run7. Verify Integration with Home Assistant
Once the device boots, it will announce itself via mDNS. Add the following to your configuration.yaml:
esphome:
  name: xiaomi_humidifier
  platform: ESP8266
  board: esp01_1m

# No cloud, no extra credentials needed – everything runs locally.
8. Re‑assemble the Humidifier
Carefully route the wires back through the rubber foot ring, replace the cover, and secure the screws. Ensure no stray solder bridges touch the water tank area.
🎉 Your Xiaomi humidifier is now a cloud‑free, locally controlled smart device!
Benefits of Open‑Source Firmware & Cloud‑Free Operation
- Privacy First: No data leaves your home network; humidity readings stay on‑premise.
- Future‑Proof: As long as ESPHome is maintained, you can keep the device alive even if Xiaomi discontinues support.
- Full Automation: Combine the humidifier with AI marketing agents or any MQTT‑enabled automation for context‑aware humidity control.
- Cost Savings: No subscription fees for cloud services; the only cost is the initial hardware modification.
- Extensibility: Add custom sensors (e.g., temperature, VOC) by wiring extra I²C modules to the same ESP8266.
Practical Tips & Safety Warnings
Safety First
- Always disconnect the power before opening the unit.
- Work in a dry environment; moisture and electronics do not mix.
- Double‑check polarity on the VCC line – feeding 5 V will destroy the ESP8266.
- Use heat‑shrink tubing on all solder joints to prevent short circuits.
Tips for a Smooth Flash
- Set the FTDI adapter to 3.3 V mode; many adapters default to 5 V.
- If flashing fails, try lowering the baud rate to 115200.
- Keep the humidifier’s firmware backup in a safe folder; you may need it for warranty claims.
- After flashing, give the device a few minutes to stabilize before adding it to Home Assistant.
Conclusion
Transforming the Xiaomi Mi Smart Antibacterial Humidifier into a privacy‑preserving, locally controlled device is a rewarding project for any smart‑home hobbyist. By leveraging ESPHome, you gain a future‑proof, extensible platform that integrates effortlessly with UBOS platform overview and other open‑source ecosystems.
Ready to take the next step? Explore UBOS’s UBOS templates for quick start to prototype additional IoT automations, or join the UBOS partner program to collaborate with a community of AI‑driven developers.
Start hacking today and enjoy a truly independent smart home!
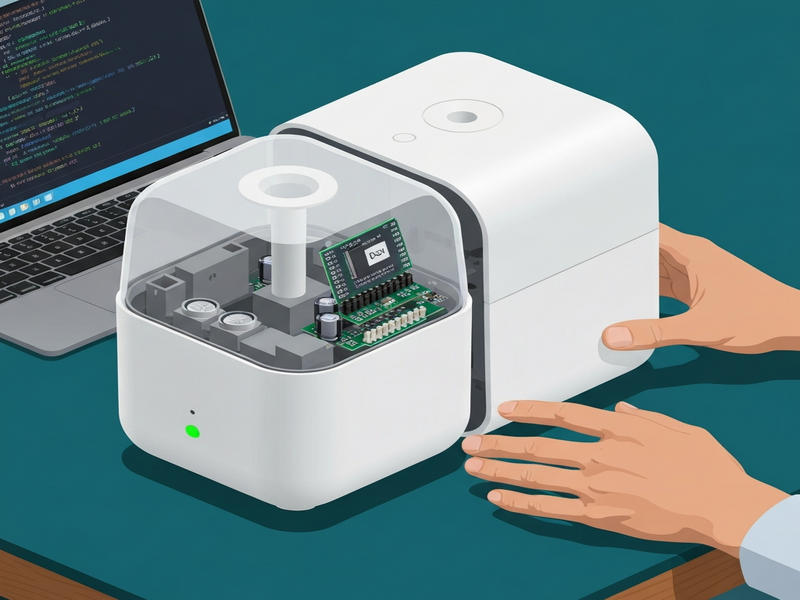
Figure: Inside view of the Xiaomi humidifier showing the ESP8266 module and wiring layout.
Read the original source here.
Related reads:
Smart Home Firmware Updates,
ESPHome Integration Guide.