Unleash the Power of AI with Remote MCP Servers on Cloudflare and UBOS
In the rapidly evolving landscape of artificial intelligence, the ability to seamlessly integrate Large Language Models (LLMs) with external data sources and tools is paramount. This is where the Model Context Protocol (MCP) comes into play. MCP standardizes how applications provide context to LLMs, creating a more robust and versatile AI ecosystem. This document guides you through setting up a remote MCP server on Cloudflare, connecting it with tools like Claude and the MCP Inspector, and leveraging the UBOS platform to streamline AI agent development.
What is MCP and Why is it Important?
Model Context Protocol (MCP) is an open standard designed to facilitate the interaction between LLMs and external resources. Think of it as a universal translator that allows AI models to understand and utilize information from various sources, such as databases, APIs, and other applications. By providing a standardized way for applications to provide context to LLMs, MCP unlocks a new level of AI capabilities. This ensures interoperability and reduces the complexity of integrating AI into existing systems.
The MCP server acts as a central hub, managing requests from AI models and routing them to the appropriate external tools or data sources. It then relays the responses back to the AI model in a format it can understand. This abstraction simplifies the process of building AI-powered applications and allows developers to focus on the core logic of their models.
Setting Up a Remote MCP Server on Cloudflare
This guide focuses on deploying a remote MCP server on Cloudflare Workers. Cloudflare Workers provide a serverless environment ideal for running lightweight applications like MCP servers. By leveraging Cloudflare’s global network, you can ensure low latency and high availability for your AI integrations.
Local Development
Before deploying to Cloudflare, it’s essential to develop and test your MCP server locally. This allows you to iterate quickly and debug any issues before they impact your production environment. Here’s how to get started:
Clone the Repository: Begin by cloning the
cloudflare/airepository from GitHub. This repository contains the necessary code and configurations for setting up the MCP server.bash git clone git@github.com:cloudflare/ai.git
Install Dependencies: Navigate to the
aidirectory and install the required dependencies using npm.bash cd ai npm install
Run Locally: Start the local development server using the following command.
bash npx nx dev remote-mcp-server
This command will launch the MCP server, and you should be able to access it at
http://localhost:8787/in your web browser.
Connecting the MCP Inspector
The MCP Inspector is a valuable tool for exploring and testing your MCP API. It allows you to send requests to your MCP server and inspect the responses, ensuring everything is working as expected.
Start the MCP Inspector: Run the following command to start the MCP Inspector.
bash npx @modelcontextprotocol/inspector
This will open the MCP Inspector in your web browser, typically at
http://localhost:5173.Configure the Connection: Within the MCP Inspector, switch the Transport Type to
SSE(Server-Sent Events) and enterhttp://localhost:8787/sseas the URL of your local MCP server. Click the “Connect” button.Login: You will be redirected to a mock user/password login screen. Enter any email and password to proceed.
Explore the API: After logging in, you should be redirected back to the MCP Inspector, where you can now list and call any defined tools exposed by your MCP server.
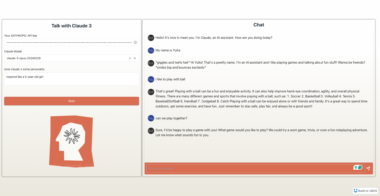
Connecting Claude Desktop
Connecting your MCP server to Claude allows you to leverage its powerful AI capabilities with the context provided by your server. Follow these steps to integrate Claude with your local MCP server:
Anthropic’s Quickstart: Follow Anthropic’s Quickstart guide to set up Claude Desktop.
Edit Configuration: Within Claude Desktop, go to Settings > Developer > Edit Config to find your configuration file.
Replace Configuration: Open the configuration file in a text editor and replace its contents with the following:
{ “mcpServers”: { “math”: { “command”: “npx”, “args”: [ “mcp-remote”, “http://localhost:8787/sse” ] } } }
This configuration will run a local proxy that enables Claude to communicate with your MCP server over HTTP.
Login and Verify: When you open Claude, a browser window should appear, prompting you to log in. Once logged in, you should see the available tools in the bottom right corner of the Claude interface.
Test the Integration: Give Claude a prompt that requires the use of one of the tools exposed by your MCP server. If the integration is successful, Claude should ask to call the tool to fulfill the request.
Deploying to Cloudflare
Once you have successfully tested your MCP server locally, you can deploy it to Cloudflare Workers. This will make your server accessible from anywhere in the world with low latency.
Create a KV Namespace: Create a KV (Key-Value) namespace using the Cloudflare Wrangler CLI.
bash npx wrangler kv namespace create OAUTH_KV
Update
wrangler.jsonc: Follow the instructions provided by the Wrangler CLI to add the KV namespace ID to yourwrangler.jsoncfile. This will allow your Cloudflare Worker to access the KV store.Deploy: Deploy your MCP server to Cloudflare Workers using the following command.
bash npm run deploy
Connecting to the Deployed Server
After deploying your MCP server, you can connect to it using the MCP Inspector or Claude Desktop, just as you did with the local server.
MCP Inspector
Run the MCP Inspector and enter the workers.dev URL of your deployed worker (e.g., worker-name.account-name.workers.dev/sse) as the URL of the MCP server. Click “Connect” to establish the connection.
Claude Desktop
Update the Claude configuration file to point to the workers.dev URL of your deployed worker. Restart Claude to apply the changes.
{ “mcpServers”: { “math”: { “command”: “npx”, “args”: [ “mcp-remote”, “https://worker-name.account-name.workers.dev/sse” ] } } }
Debugging
If you encounter any issues during the setup or deployment process, the following tips may help:
Restart Claude: Restarting Claude can sometimes resolve connection issues.
Command-Line Connection: Use the
mcp-remotecommand to connect directly to your MCP server from the command line.bash npx mcp-remote http://localhost:8787/sse
Clear Authentication Files: In rare cases, clearing the files in the
~/.mcp-authdirectory can help.bash rm -rf ~/.mcp-auth
UBOS: The Full-Stack AI Agent Development Platform
UBOS is a comprehensive platform designed to streamline the development and deployment of AI agents. By integrating seamlessly with MCP servers and other AI infrastructure components, UBOS empowers businesses to harness the full potential of AI. UBOS focused on bringing AI Agent to every business department. Our platform help you orchestrate AI Agents, connect them with your enterprise data, build custom AI Agents with your LLM model and Multi-Agent Systems.
Key Features of UBOS
- AI Agent Orchestration: UBOS provides a visual interface for designing and managing complex AI agent workflows.
- Enterprise Data Connectivity: Connect your AI agents to various enterprise data sources, including databases, APIs, and cloud storage.
- Custom AI Agent Development: Build custom AI agents tailored to your specific business needs using your LLM model.
- Multi-Agent Systems: Design and deploy multi-agent systems that can collaborate to solve complex problems.
Use Cases for UBOS
- Customer Service Automation: Automate customer service tasks with AI-powered chatbots and virtual assistants.
- Sales and Marketing Optimization: Improve sales and marketing performance with AI-driven insights and recommendations.
- Financial Analysis: Automate financial analysis tasks and gain insights into market trends.
- Healthcare Diagnostics: Assist healthcare professionals with AI-powered diagnostic tools.
Conclusion
By deploying a remote MCP server on Cloudflare and leveraging the UBOS platform, you can unlock a new level of AI capabilities for your business. Seamlessly integrate LLMs with external data sources and tools, streamline AI agent development, and automate critical business processes. Embrace the future of AI with MCP and UBOS.
Remote MCP Server on Cloudflare
Project Details
- grocco/remote-mcp-server
- remote-mcp-server
- Last Updated: 4/26/2025
Recomended MCP Servers
🚀 DeepSeek-V3 R1大模型逆向API【特长:良心厂商】(官方贼便宜,建议直接走官方),支持高速流式输出、多轮对话,联网搜索,R1深度思考,零配置部署,多路token支持,仅供测试,如需商用请前往官方开放平台。
A Model Context Protocol Server To Generate Images
This read-only MCP Server allows you to connect to SAP ERP data from Claude Desktop through CData JDBC...
A MCP server connecting to managed indexes on LlamaCloud
MCP server providing secure code execution (Python, Go, JS) via containers.
Universal Test Automation MCP Server with self-healing capabilities and Smithery.ai integration
A backend service for executing beeper transactions on Binance Smart Chain
MCP server that provides direct access to MySQL databases
Lightweight MCP server to give your Cursor Agent access to the Cloudflare API.
Fastly MCP brings the power of Fastly's API directly to your AI assistants through the Model Context Protocol...
Featured Templates
View More