Build Agents with Needle MCP Server
MCP (Model Context Protocol) server to manage documents and perform searches using Needle through Claude’s Desktop Application.
Table of Contents
- Overview
- Features
- Usage
- Commands in Claude Desktop
- Result in Needle
- Installation
- Video Explanation
Overview
Needle MCP Server allows you to:
- Organize and store documents for quick retrieval.
- Perform powerful searches via Claude’s large language model.
- Integrate seamlessly with the Needle ecosystem for advanced document management.
Features
- Document Management: Easily add and organize documents on the server.
- Search & Retrieval: Claude-based natural language search for quick answers.
- Easy Integration: Works with Claude Desktop and Needle collections.
Usage
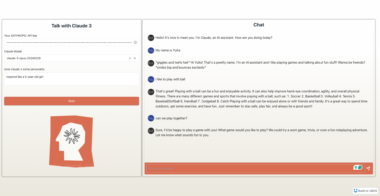
Commands in Claude Desktop
Below is an example of how the commands can be used in Claude Desktop to interact with the server:
- Open Claude Desktop and connect to the Needle MCP Server.
- Use simple text commands to search, retrieve, or modify documents.
- Review search results returned by Claude in a user-friendly interface.
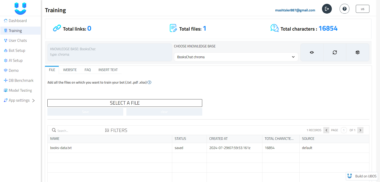
Result in Needle
https://github.com/user-attachments/assets/0235e893-af96-4920-8364-1e86f73b3e6c
Youtube Video Explanation
For a full walkthrough on using the Needle MCP Server with Claude and Claude Desktop, watch this YouTube explanation video.
Installation
Installing via Smithery
To install Needle MCP for Claude Desktop automatically via Smithery:
npx -y @smithery/cli install needle-mcp --client claude
Manual Installation
- Clone the repository:
git clone https://github.com/yourusername/needle-mcp.git
- Install UV globally using Homebrew in Terminal:
brew install uv
Create claude_desktop_config.json:
- For MacOS: Open directory
~/Library/Application Support/Claude/and create the file inside it - For Windows: Open directory
%APPDATA%/Claude/and create the file inside it
- For MacOS: Open directory
Add this configuration to claude_desktop_config.json:
{
  "mcpServers": {
    "needle_mcp": {
      "command": "uv",
      "args": [
        "--directory",
        "/path/to/needle-mcp",
        "run",
        "needle-mcp"
      ],
      "env": {
        "NEEDLE_API_KEY": "your_needle_api_key"
      }
    }
  }
}
Get your Needle API key from needle.xyz
Update the config file:
- Replace
/path/to/needle-mcpwith your actual repository path - Add your Needle API key
- Replace
Quit Claude completely and reopen it
Usage Examples
- “Create a new collection called ‘Technical Docs’”
- “Add this document to the collection, which is https://needle-ai.com”
- “Search the collection for information about AI”
- “List all my collections”
Troubleshooting
If not working:
- Make sure UV is installed globally (if not, uninstall with
pip uninstall uvand reinstall withbrew install uv) - Or find UV path with
which uvand replace"command": "uv"with the full path - Verify your Needle API key is correct
- Check if the needle-mcp path in config matches your actual repository location
Reset Claude Desktop Configuration
If you’re seeing old configurations or the integration isn’t working:
- Find all Claude Desktop config files:
find / -name "claude_desktop_config.json" 2>/dev/null
- Remove all Claude Desktop data:
- On MacOS:
rm -rf ~/Library/Application Support/Claude/* - On Windows: Delete contents of
%APPDATA%/Claude/
- Create a fresh config with only Needle:
mkdir -p ~/Library/Application Support/Claude
cat > ~/Library/Application Support/Claude/claude_desktop_config.json
<< 'EOL'
{
  "mcpServers": {
    "needle_mcp": {
      "command": "uv",
      "args": [
        "--directory",
        "/path/to/needle-mcp",
        "run",
        "needle-mcp"
      ],
      "env": {
        "NEEDLE_API_KEY": "your_needle_api_key"
      }
    }
  }
}
EOL
Completely quit Claude Desktop (Command+Q on Mac) and relaunch it
If you still see old configurations:
- Check for additional config files in other locations
- Try clearing browser cache if using web version
- Verify the config file is being read from the correct location
Needle

Project Details
- needle-ai/needle-mcp
- MIT License
- Last Updated: 4/17/2025
Recomended MCP Servers
🔎 A Model Context Protocol (MCP) server for integrating Perplexity's AI API with LLMs.
An MCP server for interacting with the Financial Datasets stock market API.
Control Neovim using Model Context Protocol (MCP) and the official neovim/node-client JavaScript library
Execute a secure shell in Claude Desktop using the Model Context Protocol.
mcp server for interacting with HubSpot
An advanced MCP server for Home Assistant. 🔋 Batteries included.
🔍 Enable AI assistants to search and access bioRxiv papers through a simple MCP interface.
Payload CMS MCP Server
A powerful Model Context Protocol (MCP) server providing comprehensive Google Maps API integration with LLM processing capabilities.
Model Context Protocol (MCP) for interacting with dicom servers (PACS etc.)
mcp server for gitingest
Featured Templates
View More