Google Tasks MCP Server
This Model Context Protocol (MCP) server provides a bridge between Claude and Google Tasks, allowing you to manage your task lists and tasks directly through Claude.
Note: All ( bar some edits ) code in this project was “vibe coded” - generated with Claude with instructions from me.
Features
This MCP server provides the following functionality:
Task List Management
list-tasklists- List all your task listsget-tasklist- Get details about a specific task listcreate-tasklist- Create a new task listupdate-tasklist- Update an existing task listdelete-tasklist- Delete a task list
Task Management
list-tasks- List all tasks in a task listget-task- Get details about a specific taskcreate-task- Create a new taskupdate-task- Update an existing taskdelete-task- Delete a taskcomplete-task- Mark a task as completedmove-task- Move a task (reorder or change parent)clear-completed-tasks- Clear all completed tasks from a list
Setup Instructions
1. Create Google Cloud Project & Enable API
- Go to the Google Cloud Console
- Create a new project
- Navigate to “APIs & Services” > “Library”
- Search for “Google Tasks API” and enable it
- Go to “APIs & Services” > “Credentials”
- Click “Create Credentials” > “OAuth Client ID”
- Configure the OAuth consent screen (External is fine for personal use)
- For Application Type, select “Web application”
- Add “http://localhost:3000” as an authorized redirect URI
- Create the client ID and secret
2. Configure Claude for Desktop
- Install Claude for Desktop
- Open the Claude configuration file:
- MacOS:
~/Library/Application Support/Claude/claude_desktop_config.json - Windows:
%APPDATA%Claudeclaude_desktop_config.json
- MacOS:
- Add the Google Tasks MCP server configuration:
{
  "mcpServers": {
    "google-tasks": {
      "command": "node",
      "args": ["/path/to/google-tasks-mcp/build/index.js"],
      "env": {
        "GOOGLE_CLIENT_ID": "your_client_id_here",
        "GOOGLE_CLIENT_SECRET": "your_client_secret_here",
        "GOOGLE_REDIRECT_URI": "http://localhost:3000/oauth2callback"
      }
    }
  }
}
Replace the path and credentials with your own values.
3. Build and Run the Server
- Install dependencies:
npm install
- Build the server:
npm run build
- Restart Claude for Desktop
Authentication Flow
When you first use the Google Tasks MCP server:
- Use the
authenticatetool to get an authorization URL - Visit the URL in your browser and sign in with your Google account
- After authorizing, you’ll receive a code on the browser page
- Use the
set-auth-codetool with this code to complete authentication - You can now use all other tools to interact with Google Tasks
Note that your authentication is session-based and will be lost when you restart the server. You’ll need to re-authenticate each time.
Requirements
- Node.js 14+
- Claude for Desktop (latest version)
- Google Cloud Project with Tasks API enabled
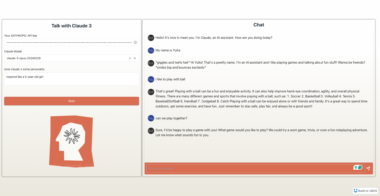
Screenshot

License
This project is for demonstration purposes only. Use at your own risk.
Google Tasks Integration Server

Project Details
- arpitbatra123/mcp-googletasks
- Last Updated: 4/17/2025
Recomended MCP Servers
A Model Context Protocol (MCP) server that provides file system context to Large Language Models (LLMs). This server...
macOS defaults - Model Context Protocol server
Model Context Protocol (MCP) server for @glideapps API
Model Context Protocol Server for Safely Executing Pre-approved Commands
This is MCP server for Claude that gives it terminal control, file system search and diff file editing...
A Model Context Protocol (MCP) server implementation for Gumroad API
This is an MCP (Model Context Protocol) server that connects your Limitless Pendant data to AI tools like...
Featured Templates
View More