
- Updated: March 12, 2026
- 6 min read
Integrating OpenClaw with VS Code: Setup, Extensions, and Workflow
Integrating OpenClaw with VS Code lets developers and DevOps engineers manage containers directly from the editor, turning a complex workflow into a single‑click experience.
1. Introduction
OpenClaw is a lightweight, open‑source container orchestration tool that excels in local development and edge deployments. When paired with Visual Studio Code, the most popular IDE among developers, you gain a unified environment for coding, building, and deploying containers without leaving the editor.
This guide walks you through the entire OpenClaw‑VS Code integration—from prerequisites and required extensions to secret handling best practices and a visual workflow diagram. By the end, you’ll be able to spin up, monitor, and tear down containers with a few keystrokes, boosting productivity and reducing context‑switching.
For a deeper dive into container management concepts, see the official OpenClaw hosting page.
2. Prerequisites
- VS Code ≥ 1.80 installed on Windows, macOS, or Linux.
- Node.js ≥ 18 (required for the OpenClaw CLI).
- Docker Engine running locally (or a remote Docker daemon you can access).
- Git installed for version control.
- An official OpenClaw announcement (external reference for context).
Make sure Docker is configured to allow non‑root users to execute commands; otherwise, VS Code will fail to communicate with the daemon.
3. Required VS Code Extensions
The following extensions create the bridge between VS Code and OpenClaw:
- Docker – Provides container view, image management, and Dockerfile syntax highlighting.
- OpenClaw Helper – A community‑maintained extension that adds commands for
openclaw init,openclaw up, andopenclaw downdirectly in the command palette. - YAML – Enables schema validation for
openclaw.ymlconfiguration files. - Secret Management – Stores environment variables securely using VS Code’s secret storage API.
You can install them quickly via the Extensions view (Ctrl+Shift+X) or by running:
code --install-extension ms-azuretools.vscode-docker
code --install-extension openclaw.openclaw-helper
code --install-extension redhat.vscode-yaml
code --install-extension ms-vscode.secret-storage
4. Step‑by‑Step Setup
4.1. Install the OpenClaw CLI
Open a terminal inside VS Code (Ctrl+`) and run:
npm install -g openclaw-cliVerify the installation:
openclaw --version4.2. Initialise a New Project
Navigate to your project folder and initialise OpenClaw:
mkdir my‑app && cd my‑app
openclaw init
This creates an openclaw.yml file with a default service definition.
4.3. Configure Services
Edit openclaw.yml to match your stack. Example for a Node.js API and a Redis cache:
services:
  api:
    build: .
    ports:
      - "3000:3000"
    env_file: .env
  redis:
    image: redis:7-alpine
    ports:
      - "6379:6379"
4.4. Add VS Code Tasks
Define custom tasks in .vscode/tasks.json to run OpenClaw commands from the UI:
{
  "version": "2.0.0",
  "tasks": [
    {
      "label": "OpenClaw: Up",
      "type": "shell",
      "command": "openclaw up",
      "group": "build",
      "problemMatcher": []
    },
    {
      "label": "OpenClaw: Down",
      "type": "shell",
      "command": "openclaw down",
      "group": "test",
      "problemMatcher": []
    }
  ]
}
4.5. Run the Stack
Press F1, type “Tasks: Run Task”, and select “OpenClaw: Up”. VS Code will launch the containers, and the Docker extension will display them in the sidebar.
4.6. Verify Connectivity
Open a new terminal and exec into the API container:
docker exec -it my‑app_api_1 sh
curl http://localhost:3000/health
You should receive a 200 OK response, confirming that OpenClaw and VS Code are communicating correctly.
5. Example Code Snippets
Below are practical snippets you’ll often reuse when working with OpenClaw inside VS Code.
5.1. Dynamic Environment Variables
# .env
NODE_ENV=development
API_PORT=3000
REDIS_HOST=redis
REDIS_PORT=6379
5.2. Using VS Code’s Secret Storage
// secret-manager.js
import * as vscode from 'vscode';

export async function storeSecret(key, value) {
  await vscode.secretStorage.store(key, value);
}

export async function getSecret(key) {
  return await vscode.secretStorage.get(key);
}

// Usage in openclaw.yml
services:
  api:
    env:
      - DB_PASSWORD=${{ secret:DB_PASSWORD }}
5.3. Custom VS Code Command (OpenClaw Helper)
// extension.js (simplified)
import * as vscode from 'vscode';
import { exec } from 'child_process';

export function activate(context) {
  const up = vscode.commands.registerCommand('openclaw.up', () => {
    exec('openclaw up', (err, stdout, stderr) => {
      if (err) {
        vscode.window.showErrorMessage(`OpenClaw error: ${stderr}`);
      } else {
        vscode.window.showInformationMessage('OpenClaw stack started');
      }
    });
  });
  context.subscriptions.push(up);
}
6. Secret Handling Best Practices
Storing credentials securely is non‑negotiable in any container workflow. Follow these guidelines to keep secrets safe while using OpenClaw and VS Code.
- Never commit
.envfiles to version control. Add them to.gitignoreand usegit update-index --assume-unchanged .envfor existing repos. - Leverage VS Code’s Secret Storage API (as shown in the snippet above) for API keys, database passwords, and tokens.
- Use Docker secrets for production when deploying to a swarm or Kubernetes cluster. OpenClaw can reference them via the
secretsfield inopenclaw.yml. - Rotate credentials regularly and automate rotation with a CI pipeline that updates the secret store and redeploys the stack.
- Audit secret usage by enabling Docker’s
--log-level=debugflag during development to spot accidental exposure.
For a broader perspective on secret management across the UBOS ecosystem, explore the UBOS partner program page.
7. Workflow Diagram Illustration
The diagram below visualises the end‑to‑end OpenClaw workflow inside VS Code, from code edit to container deployment and monitoring.
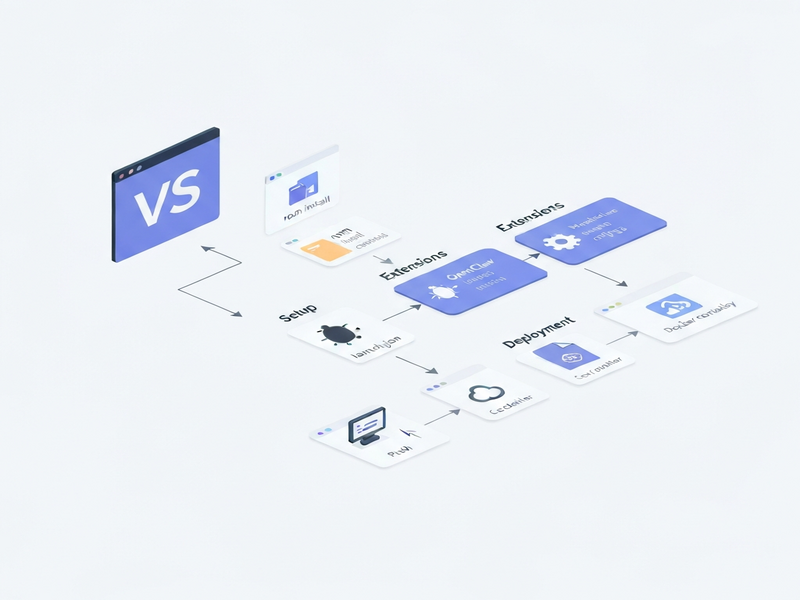
Figure: OpenClaw integration flow – code → VS Code tasks → OpenClaw CLI → Docker Engine → Running containers.
8. Conclusion
By following this guide, you’ve transformed VS Code into a full‑featured container orchestration hub powered by OpenClaw. The setup empowers developers to iterate faster, DevOps engineers to enforce consistent environments, and teams to keep secrets out of the codebase.
Ready to scale your workflow? Check out the Enterprise AI platform by UBOS for advanced monitoring, or explore the UBOS templates for quick start that include pre‑configured OpenClaw stacks.
Happy coding, and may your containers always stay healthy!
Further Reading & Tools
- UBOS homepage – Overview of the platform powering modern AI‑driven workflows.
- UBOS platform overview – Deep dive into modular services and integrations.
- AI SEO Analyzer – Optimize your content for search engines with AI.
- AI Article Copywriter – Generate high‑quality drafts in seconds.
- UBOS pricing plans – Choose a plan that fits your team size.
- AI marketing agents – Automate campaign creation and analysis.
- UBOS for startups – Fast‑track product launches.
- UBOS solutions for SMBs – Scalable tools for growing businesses.
- Web app editor on UBOS – Build full‑stack apps without leaving the browser.
- Workflow automation studio – Orchestrate complex pipelines with drag‑and‑drop.